Gasket information and the tests used to generate it can help users make the best possible equipment selections.
by Jim Drago

Every industry has its own terminology. For example, depending on the frame of reference, the acronym "API" can mean American Petroleum Institute, active pharmaceutical ingredient or application programming interfaces. To know what is meant, one needs to know the context. In the case of industrial sealing products, the context is often a catalog published by the manufacturer, which to the uninitiated, may raise as many questions as it answers. Yet, accurately deciphering the information is vital to making informed decisions in the selection of the optimal seal for a particular application (see Table 1).
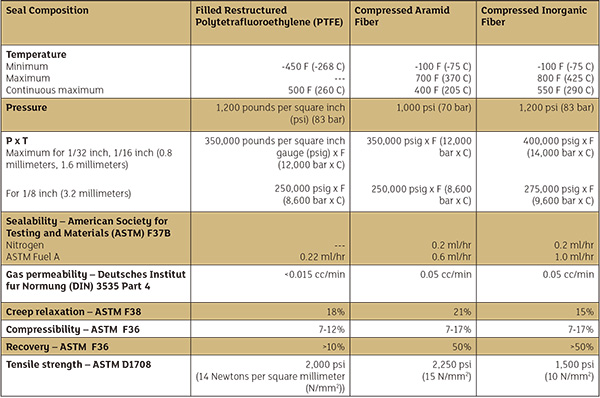
Typical catalog information for gasketsTable 1. Typical catalog information for gaskets
When considering gasket information, note that the service temperature, pressure and pressure X temperature (P X T) values of the intended application do not exceed the published ratings of the product. Temperature limits are sometimes expressed in what appears to be a dual rating—maximum and continuous maximum. Maximum temperature is the temperature the material could survive for an extremely short duration. The continuous maximum temperature is the working or allowable temperature a product can withstand for the duration of its service life. Analogous to these limits is the published tensile strength of a structural material, where the maximum temperature would be expressed as ultimate or yield stress, and the continuous maximum temperature would correlate to maximum allowable stress. This stress is typically the ultimate stress divided by a safety factor. Chemical compatibility of the material with the media is another important consideration. Gasket manufacturers publish tables ranking acceptability with hundreds of common media. Users should also consult the sealability numbers and consider the nature of the media being sealed. Lower values indicate the ability to seal more tightly than higher ones. When comparing gasket materials, the unit of measure should be noted. Sealability data is expressed in milliliters per hour (ml/hr), milliliters per minute (ml/min) or cubic centimeters per minute (cc/min).
A technician tests a gasket for leak tightness using DIN-3535 methodImage 1. A technician tests a gasket for leak tightness using DIN-3535 method and equipment. (Images and graphics courtesy of Garlock Sealing Technologies, LLC)
If the application thermally cycles, consider gasket materials with the lowest creep values, indicating they will not become as thin under compressive load as materials with higher values. The more a gasket creeps, the more load will be lost from the flange bolts. This loosening can result in shorter service life, leaks or blow-out. Note that thinner gaskets tend to creep less than thicker ones. In the case of non-metallic, worn or damaged flanges, materials with higher compressibility should be chosen. The higher the compressibility of a gasket, the more conformable it will be to the flange surface. The manufacturer should always be consulted with regard to the choice of product and selection logic.

Gasket Sheet Properties, Test Methods & Significance

The following information describes in more detail the types of tests conducted and the meaning of the results.

P X T – Pressure X Temperature Value

Test equipment includes a flanged joint, heat source and pressure source. In this destructive test, the gasket is taken to a point of failure. The pressure and temperature at failure are noted, the product of which is the ultimate level to which a safety factor is applied for the published value.

ASTM F37B & DIN 3535-4

ASTM F37B "Standard Test Methods for Sealability of Gasket Materials" and DIN 3535-4 "Seals in gas supply; seals of It-Plates for gas valves, gas appliances and gas pipelines" gauge how well the material seals. F37 and DIN 3535-4 give seal tightness at standardized pressures and ambient temperatures. Custom tests can introduce elevated temperatures and thermal cycling. F37 covers both gas and liquid at relatively low pressures and compressive loads on the gasket. DIN 353-4 compressive loads on the gasket are at levels that might be found in a Class 150 raised-face flange. Gas is at a pressure of 580 psig.

ASTM F38 & DIN 52913

ASTM F38 "Standard Test Methods for Creep Relaxation of Gasket Material" and DIN 52913 "Testing of static gaskets for flange connections - Compression creep testing of gaskets made from sheets" indicate joint longevity. Standard temperature, compressive load and duration rank the ability of a material to maintain its thickness, which indicates how well a flanged joint will maintain its tightness. The F38 tests are conducted at 100 C (212 F) for 22 hours and DIN 52913 at 300 C (572 F) for 16 or 100 hours.

ASTM F36

The "Standard Test Methods for Compressibility and Recovery of Gasket Material" are ambient temperature tests that indicate the ability of a material to compress and conform under load. The recovery portion of the test reveals the material's resilience. The test results have little meaning after a material has been exposed to elevated temperatures. The greater the compressibility, the more apt the material is to conform to flange surface irregularities.

ASTM F152

The "Standard Test Methods for Tension Testing of Nonmetallic Gasket Materials" look at material strength. Gaskets are cut into standard tensile test "dog bone" coupons. The results indicate that the material has been manufactured properly and is strong enough to be cut and handled.

Conclusion

Understanding published gasket information and the tests used to generate it provide confidence in the process of selecting application-appropriate materials. These selections, in turn, can be confirmed by the manufacturer's applications engineers resulting in well-informed choices.