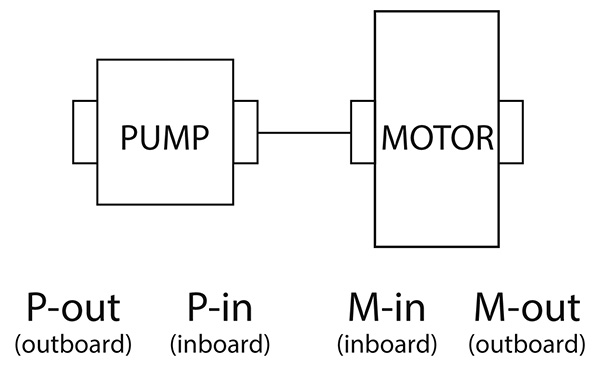
Typically, vibration measurements are taken with a handheld accelerometer probe in four places:
- Pump outboard bearing housing
- Pump inboard bearing housing
- Motor inboard bearing housing
- Motor outboard bearing housing
These measurement locations are shown in Figure 1. At each location, readings are taken in horizontal, vertical and axial directions. The probes are typically one-directional accelerometers (readings in g-force—G).
 |
 |
| Figure 1. Identification of pump/motor probe locations |
What is more commonly used is the vibration’s integrated value (velocity of vibrations, inches/second), and less common, its second integral, which is displacement (mils).
Small Pumps
For a small pump, the exact position of the probe is not critical. Because of the bearing housing’s small size, there is not much room to choose the exact location of the probe. It may also be difficult to establish a firm contact between the probe magnet and the curvature of the housing. These factors influence the accuracy of the readings, but a typical error does not change much more than about 0.01 to 0.02 inch/second or so.
For example, a 0.20 inch/second value may vary between 0.19 inch/second and 0.21 inch/second, depending on how well the probe sits on the housing and the exact position.
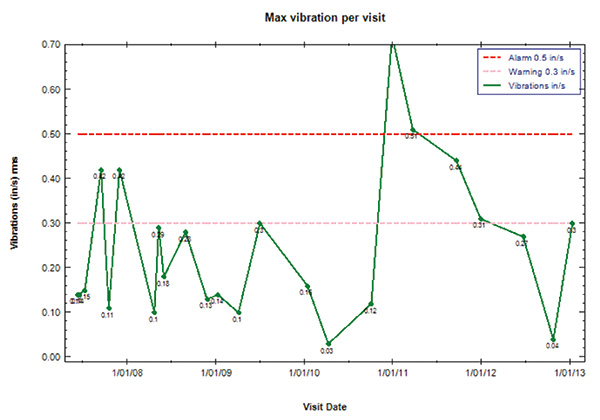
Typical field allowances are usually 0.3 inch/second (warning) and 0.5 inch/second (alarm). In most cases, an absolute value is not as important as trend data (see Figure 2).
 |
| Figure 2. Periodic (monthly, quarterly) vibration trends (overall root mean square—RMS—values) |
For new installations, during unit commissioning, the allowable vibration values are smaller. They are typically half those described in the previous paragraph. They are most often 0.15 inch/second (warning) or commissioning acceptance of the contractual level.
Large Pumps
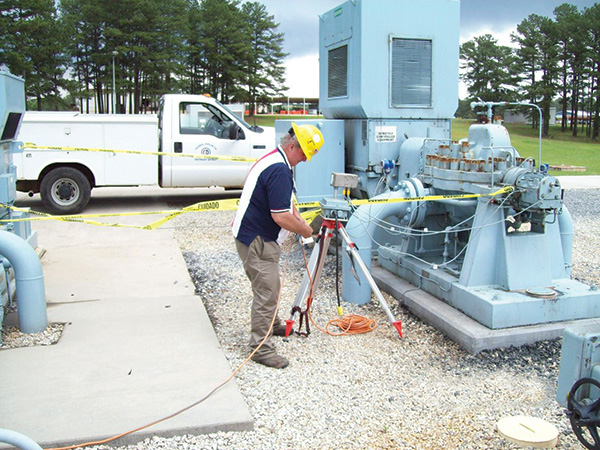
For larger units, however, probe placement can make a big difference. In Image 1, the accelerometer is positioned near the end of the outboard side of the pump’s outboard bearing housing and is reading the axial vibration. Locating the probe on the same housing (pump outboard in relation to the coupling) but on the inside (assuming enough room is available to insert the probe) may show a significantly different reading.
 |
| Image 1. Outboard side probe placement |
With the larger housing, different parts will vibrate at significantly different levels. This difference, however, is not a direct indication of a bearing problem. The differing vibrations may indicate the structural integrity of the housing, such as cracks in certain areas, loose bolting or the attachment to the main pump body.
The information in the previous paragraph applies to routine or periodic (monthly, quarterly) measurements. Overall (RMS) vibrations are sufficient to reveal any issues beyond the norm. When issues are identified—an increasing trend or a sudden spike occurrence—more precise troubleshooting and examination should be employed.
For example, an end user should perform a full spectral analysis (Fast Fourier transform—FFT), instead of the RMS. In routine RMS readings, a difference between 0.02 inch/second is not critical. Therefore, positioning the probe within the housing is not critical either.
The Case for Continuous Monitoring
A typical monthly route within a plant or other industrial/municipal facility may include 30 to 40 units. Perhaps one or two units were identified as problematic. On these units, more extensive vibration monitoring was conducted, which included a full spectral FFT analysis, with the probe placed at different locations within the housing. In some problematic cases, continual monitoring of the unit may be needed. In this case, a portable vibration system could be installed that closely and continuously monitors the pumps to determine when a sudden (but repeatable) spike in vibration occurs. Sometimes, unexpected reasons for vibration can be discovered, such as floor vibrations because of an 18-wheeler delivering cement every Tuesday at 4 a.m.
A monitoring system like this would read data at the same four locations, but with tri-axial probes. A tri-axial probe reads vibrations in three directions and monitors the temperature at the point of attachment. It performs the same tasks as three single-directional probes and a temperature probe (see Image 2).
 |
| Image 2. Continuous vibration monitoring |
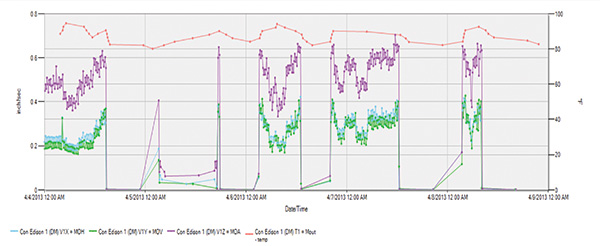
In Image 2, the probes were connected to a box that transmitted the data to a local cell tower (or local Ethernet) and could be viewed online in real time. Using this data (see Figure 3), the end user can see that one of the four tri-axial probes, which was installed on top of the pump’s inboard bearing housing, read approximately 0.2 inch/second in two directions. However, the reading in the third, axial direction was double that at 0.4 inch/second.
 |
| Figure 3. Data from the tri-axial vibration and temperature probes |
An independent probe was installed at the end of the housing (where the axial readings were more commonly measured by a single-dimensional probe). This independent probe also produced a reading of 0.2 inch/second, indicating that, in the axial direction, the bearing housing vibrated more at its top portion as compared to its end portion.
The four locations of the vibration probes (pump and motor outboard and inboard) are typically used for double suction or multistage pumps. For vertical pumps, only two probes are used. This is because the motor is the only accessible component since the pump is under the sole plate.
For municipal influent sewage lift station pumps, two or three locations are used more commonly, with tri-axial probes providing live continual data to operators over the Web (see Image 3).
 |
 |
| Image 3. Example of the continuous monitoring system at the wastewater lifting station |
Pump Quiz
In Images 4a through 4c, vibration measurements are taken in three directions at the pump outboard bearing housing (horizontal, vertical, axial).
 |
Image 4a. Vertical direction measurements |
 |
Image 4b. Horizontal direction measurements |
 |
| Image 4c. Axial direction measurements |
Which photos would you consider problematic, and why? The best answers and comments will be published in an upcoming Pumps & Systems. P&S

