Balancing couplings may not be the ultimate solution for vibration issues.
Oil and gas industry customers are increasingly asking original equipment manufacturers (OEMs) to balance their couplings to ensure that their equipment runs smoothly. While balancing is intended to reduce machine vibration, it can be an unnecessary and costly expense. Manufacturing methods and design tolerances usually result in sufficient balance so that couplings meet industry standards without additional balancing procedures.
API Balance Standards
The oil and gas industry relies on the American Petroleum Institute’s (API) 610 standard as the internationally accepted set of standards for pumps and associated equipment, such as couplings, in rotating equipment. The standard, which is now in its 11th edition, has three key clauses that address balancing couplings:
- OEMs must provide all-metal, flexible element, spacer-type couplings that meet American National Standards Institute/American Gear Manufacturers Association (ANSI/AGMA) 9000 Class 9 requirements. (API 610 6.2.2)
- Couplings that operate faster than 3,800 revolutions per minute must meet the International Standards Organization (ISO) 10441 or API 671 requirements for component balancing and assembly balance check. (API 610 6.2.2 e)
- OEMs must balance couplings to ISO 1940-1 Grade G 6.3 if the customer requests it. (API 610 6.2.3)
The first clause requires couplings to meet ANSI/AGMA 9000 Class 9, which states that the coupling’s center of rotation must not deviate more than 0.05 millimeters (0.002 inches) from the rotating axis of the machine to which it is connected. While OEMs must produce couplings accurately to achieve this standard, couplings that meet this specification typically do not require additional balancing.
The second clause states that OEMs must balance the components in higher-speed applications in compliance with API 671, a mandatory specification that leaves little room for error. OEMs can use a balancing machine to achieve this specification. For a standard coupling, the transmission unit and each hub normally have to be balanced to ISO 1940-1 Grade G 0.66, and the assembly check should be balanced to ISO 1940-1 Grade G 6.6. High-speed applications that require this level of balance are often fitted with keyless or two-key precision shaft ends. If the hubs have standard single keys, balancing the transmission unit should suffice.
The third clause requires OEMs to balance couplings to ISO 1940-1 Grade G 6.3 if the customer specifies it. Balancing the transmission unit to ISO 1940-1 Grade G 2.5 results in a better level of installed balance, however, particularly with standard bore and keyed shafts.
Some projects rely on earlier editions of the API 610 standard, particularly the 8th edition. That edition includes a requirement for balancing all components to ISO 1940-1 Grade G 1.0, which, in practice, means balancing the transmission unit and both hubs. This requires that OEMs balance the hubs before machining the keyway, wasting time and resources. Furthermore, the ANSI/AGMA 9000 Class 9 coupling standard is the only mandatory requirement in the latest API standard.
Balancing Hubs with Standard Keyways
The standard steps for balancing hubs with keyways are:
- Bore the hub to the correct size
- Balance the hub as a component
- Machine a keyway into the bore
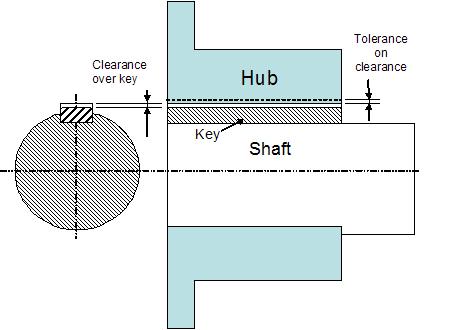
Because of the key and keyway’s tolerances, the volume of material removed above the key varies significantly, which also affects the balance of the hub in an average-sized coupling. As a result, hubs with keyways that technically meet balancing standards may still cause vibration in the equipment, even though the goal of balancing is to eliminate vibration. This means that customers who request coupling balancing according to API standards often do not realize any benefit.
As an example, the 8th edition of API 610 requires a 14.8-kilogram hub with a 100-millimeter bore installed in a machine that operates at 3,600 rpm to be balanced in two planes so that the maximum residual imbalance is less than 19.6 grams-millimeter/plane. The standard then requires a single keyway to be machined into the coupling hub and for the hub to be fitted to the shaft with a key. Keyway standards specify a certain amount of clearance over the key. In this example, the standard key is a 28-millimeter by 16-millimeter key, and the permitted mean clearance is 0.65 millimeter. Thus, the “missing mass” caused by this clearance is 7.76 gm. The hub is located at a radius of 56.5 millimeter, creating a potential imbalance of 438 gram-millimeter, or 22 times the hub balance limit.
This example demonstrates that API balancing standards ignore the imbalance caused by the key extending beyond the end of the hub boss, or the effect of the key’s rounded ends. While customers may meet generally accepted API standards by balancing their couplings, they often do not reduce vibration.
In addition, slip fits can disrupt the balance of a piece of machinery. Taking the example above, a typical H7/g6 slip fit could result in a total clearance of 0.069 millimeter or an axis displacement of 0.034 millimeter when the set screws are tightened. This introduces an imbalance of 500 gram-millimeter in a 14.8-kilogram hub. While this is a worst case scenario, customers could certainly expect an average imbalance of 250 to 300 gram-millimeters, more than 10 times the ISO 1940-1 Grade G 1.0 limit.
If we take this case a step further, here are the potential repercussions:
- Imbalance caused by keyway: 438 gram-millimeters
- Imbalance caused by slip fit: 500 gram-millimeters
- ISO 1940-1 Grade G 1.0 residual imbalance: 39.2 gram-millimeters (19.6 gram-millimeters x 2)
- ANSI/AGMA root mean square (RMS) imbalance: 666 gram-millimeters
If the hub was balanced to ISO 1940-1 Grade G 6.3 (247 gram-millimeter), then the ANSI/AGMA RMS balance would be 709 gram-millimeters, an increase of 6 percent.
It is evident from the example above that balancing a coupling and then machining in a keyway can cause huge issues since the clearance over the key has an inevitable effect on the coupling’s overall balance. Note that this example also does not take into account other assembly errors or shaft balancing, which can create additional balance issues. If equipment has vibration problems, end users should tackle the true causes of imbalance by specifying the ANSI/AGMA class and considering all causes of installed vibration.
Balancing Can Cause Production Delays
In addition to the vibration issues that balancing can cause, balancing coupling components is an involved and time-consuming process. As a result, the balancing process delays the final assembly of equipment while providing no added value to the customer, who is paying for the balancing service.
Therefore, customers should consider their couplings’ specifications carefully before requesting balancing. Specifications are particularly important when couplings operate slower than 3,800 rpm to avoid paying for services that have no benefit.
Pumps & Systems, February 2012


 Peter Carlisle is John Crane EAA’s product line director for couplings. His work with the company has included design, application and research on the fundamentals of power transmission couplings, and he served as group engineering manager for many years and has also held roles in sales management and operations management positions. He can be reached at +44 161 886 6290 or peter.carlisle@johncrane.co.uk.