Pumps & Systems, May 2008
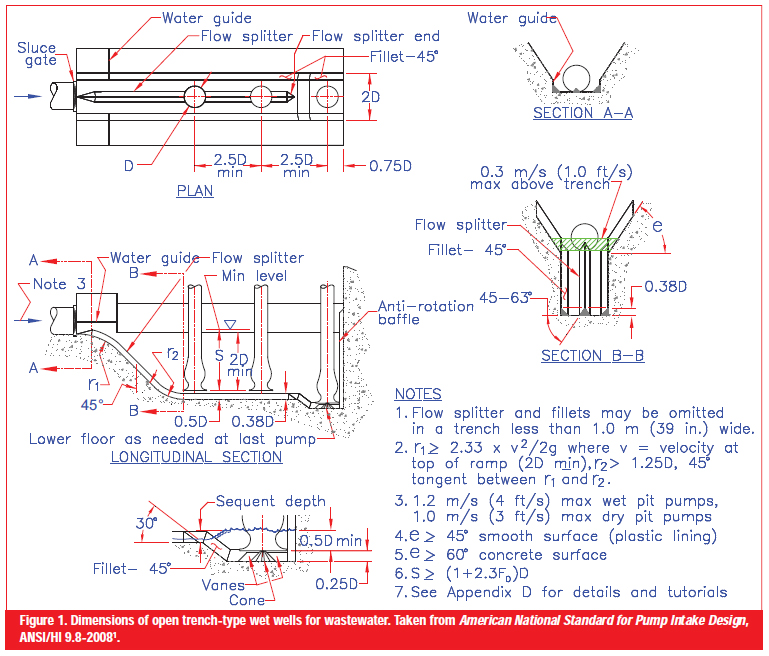
In trench-type wet wells, the pump intakes are placed near the bottom of a deep, narrow trench coaxial with the inlet pipe but considerably below it (see Figure 1). The closely confining walls of the trench prevent cross currents, which creates a good hydraulic environment for the pump intakes. The trench works very well for both water and wastewater. The ramp shown in Figure 1 is omitted in clear water applications, and the row of pumps starts immediately downstream from the end of the inlet pipe. Pumping stations with capacities in the range of as little as 2.5-Mgal/d to as much as 220-Mgal/d for both water and wastewater are currently in service and performing well. Some of these installations are more than 40 years old with no indication of poor or unacceptable pump performance. The feature that makes the trench-type wet well so attractive to wastewater operators who have used one is its ability to self-clean by using only the main pumps. Other types of wet wells must be cleaned manually or by vacuum truck. During the cleaning cycle in a trench-type wet well, all scum, sludge, grit, gravel, rags and other trash are swept into the last pump by water accelerated to a high velocity by flowing down the curved ramp. Cleaning can be completed in a few (typically between one to four) minutes with no manual labor beyond the touch of a button. The process can be automated to occur at any desired time intervals, such as once every three days or once per week. Because the trench can easily be kept clean and odor-free, this type of wet well can be placed anywhere (in residential, commercial or business districts) without adverse odor impact.
Trench-type wet wells are gaining popularity in the Midwest, South and East Coast of the United States, and they are already so popular on the West Coast that some large utilities have adopted them as standard. Recommended dimensions in terms of D (outside diameter of the pump intake suction bell) are given in American National Standard for Pump Intake Design (ANSI/HI 9.8-2007) [1], reproduced in the figure below. They were developed from years of both model and prototype testing. However, some recommendations are still occasionally ignored, and the result is usually a flawed product that will not give satisfactory performance.
The purpose of this paper is to assist designers by giving the reasons for the recommendations in ANSI/HI 9.8.
Choosing Pumps
This subject is covered thoroughly in both second and third editions of Pumping Station Design, Chapter 12 [2, 3]. In addition, some considerations specific to trench-type wet wells are described below.
Types of Pumps
Any type of water or wastewater pump (dry pit centrifugal, vertical turbine solids handling or both dry pit and wet pit submersible non-clog pumps) can be used in trench-type wet wells. Dry pit pumps can be used by installing a flare for the suction bell followed immediately by an elbow (preferably long radius) and a horizontal pipe to the dry well. Submersible pull-up pumps can be used by casting a recess for the discharge elbow in the side of the trench; after the elbow and discharge pipe are placed, the recess can be filled with lean concrete. Column pumps are ideal in trenches.
Number of Pumps
An ideal number is three-two to carry the maximum load and one for a standby. If they are variable speed units, the lowest flow rate that can be pumped is usually about 25 percent (half the capacity of a single pump) of the station capacity. Check with the manufacturer; some machines can pump at lesser capacities. However, all centrifugal pumps have a lower limit, and below the tolerable flow rate for a single pump, the pump must be turned off and on as with constant speed pumps. That may be a problem for downstream processes as sedimentation basins are upset by sudden changes in incoming flow. Other processes, such as chlorination and dechlorination, may not meet requirements at all with sudden changes in flow rates. Confer with the treatment plant designer.
If the disparity between peak wet weather flow and average dry weather flow is large, energy use can be decreased and flow matching improved by installing more pumps and in two different sizes so as to place most of the expected average dry weather flow rates in the pumps' Preferred Operating Region. Using more pumps, however, increases capital and maintenance costs, and decreasing the size of the last pump adversely affects cleaning. Decisions here depend on the designer's artfulness.
Effect of Number of Pumps on Cleaning
Cleaning is accomplished by dewatering the wet well with the last main pump, so the pump operates under the severe service conditions of inadequate submergence and inadequate net positive suction head. It is therefore desirable to reduce running time during cleaning as much as possible. If the wet well is cleaned when inflow rate to the pumping station is, say, half the capacity of the last pump, then the net dewatering flow rate is also about half the last pump's capacity. If the pumping station contains three pumps (one is a standby), the net dewatering flow rate would be about 25 percent of the total station capacity. Increasing the number of pumps to four reduces the dewatering rate to about 17 percent of the station capacity, and, of course, reduces the scouring potential as well. The result is increased running time for the pump and reduced effectiveness of cleaning. Keep the number of pumps to a minimum commensurate with other considerations such as providing for minimum flows.
Analyze each set of pumps using Trench2.0 [4], a program for calculating velocity and depth of water, Froude number and sequent depth along the trench at pump-down. Velocities less than about 7-ft/s and Froude numbers less than 3.5 are not very effective. For long wet wells, velocities can be increased by three ways: (1) widening flow splitters and fillets to increase the hydraulic radius, (2) covering the bottom with plastic coatings or linings and (3) sloping the floor beginning at the point where the velocity is too low. Use a safety factor because, as friction factors are only estimates, hydraulic calculations are never precise.
For pumping clean water, there is no need to clean the wet well, so no need for the ramp or a limit to the number of pumps, except for considerations of cost and maintenance effort.
Normal Pumping
Water should flow into the wet well from a straight pipe (or channel) at least 8 pipe diameters long and coaxial with the trench to prevent deleterious cross-currents in the basin. The incoming current flows above the trench to the end wall, dives and flows upstream along the bottom of the trench. The flow that passes pump intakes joins the incoming flow near the top of the ramp.
Swirling
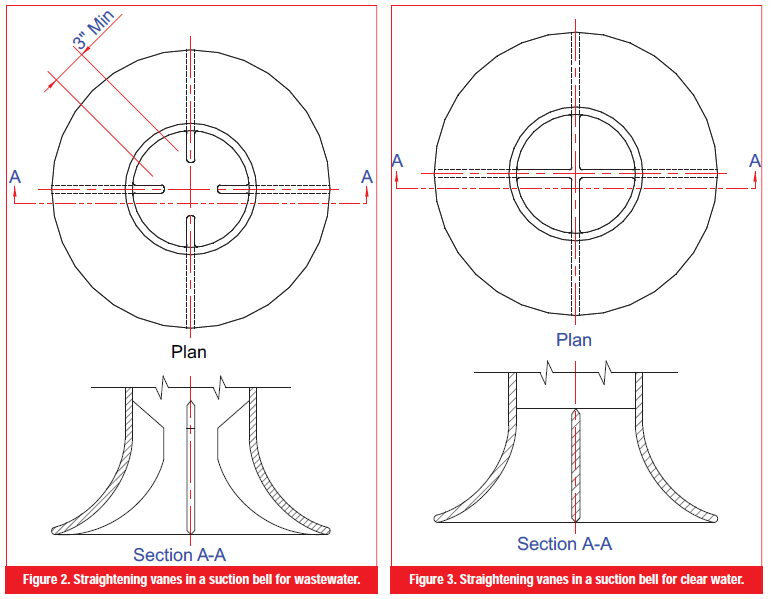
The narrow trench tends to keep currents evenly distributed, but swirling is sometimes greater than allowed in ANSI/HI 9.8. Although not mentioned in that publication, swirling can be controlled by adding straightening vanes (see the Figures 2 and 3 below) in the suction bell or in the horizontal pipe between the suction elbow and a dry pit pump. For wastewater applications, the vane design should allow for: (1) a sphere passageway of at least 3-in and at least equivalent to the pump's passageway, (2) at least four vanes (six are better) and (3) shedding of stringy material by making vane noses smooth, round and inclined less than 45-deg to the streamlines. As cast iron should not be welded, vanes can be bolted to cast iron flares used as suction bells. Of course, vanes can be welded in fabricated steel suction bells.
For clear water applications, the vanes can extend the full width of the flare. Four vanes work fairly well, but more are better. Similar to the wastewater vane application, vanes can be bolted to cast iron flares used as suction bells. Vanes in fabricated steel bells can be welded to the bell.
Entrance Baffle
Another means for improving performance, especially for reducing swirling and changing a "good pump environment" to an "ideal pump environment" is to reduce incoming currents with a baffle. Almost any baffle that intercepts the incoming current is beneficial, but a large, vertical rectangular baffle that forces flow under it and around its sides is superb. A horizontal baffle is easier to install, but it can be a rag catcher and force all the current to travel over or under it and not around the sides. Vertical baffles (see Figure 4) were found in model tests to be more effective than horizontal ones in eliminating swirling, and in a prototype, rags can slide down and off of them. The best width was 5/6 Dp, which for this 18-Mgal/d wet well just happens to equal Dp. The best bottom elevation was D/2 below the inlet invert, and the best location was 60 percent of the distance from the end of the pipe to the centerline of the first pump. The baffle can, however, be moved back and forth with only minor effects.
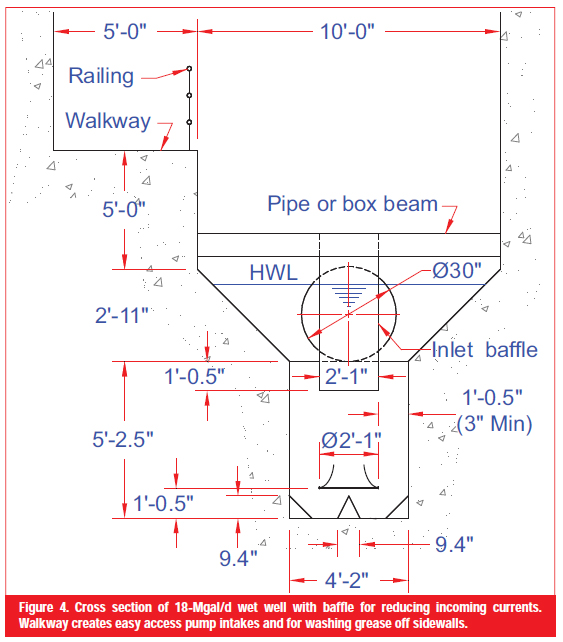
The baffle should be a thin (say, 4-in) box section, because a simple plate would probably flutter. It can be supported in many different ways. The method shown in Figure 4 is to install a box or pipe beam (that can resist both bending and torsion) above high water level (HWL). Another tactic is using a beam above HWL and another (or even the roof) above that. Another way is by means of a beam above HWL and another at the bottom of the baffle, but the lower beam would prevent shedding stringy material. The structure should be stiff enough to resist vibration due to von Karman vortices. Use stainless steel and fill box sections with concrete to resist microbial corrosion, which attacks even stainless steel in stagnant wastewater. The need for and the design of baffles should be established by hydraulic model testing.
Vortices
Strong vortices form at the trench floor under suction bells and at the trench walls about 0.28 D below the bells. As vortices tend to cause vibration and cavitation, they should either be eliminated or at least attenuated. Otherwise, impellers and casings should be made of material more resistant than cast iron. Addition of nickel to cast iron is a partial palliative, but there are other metals far more cavitation (but not vibration) resistant.
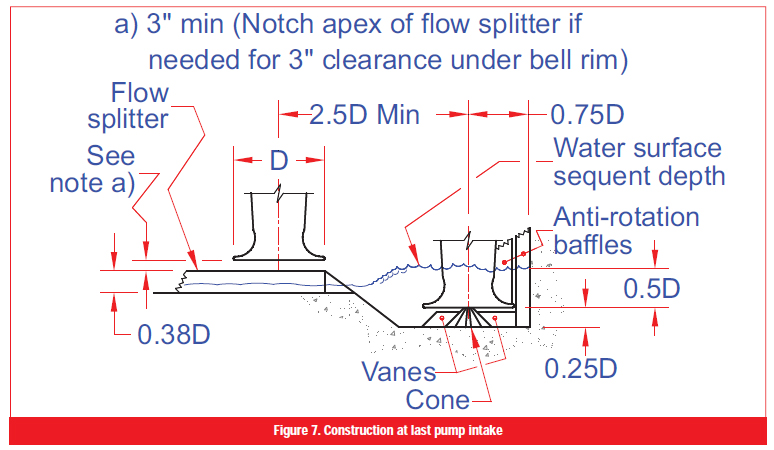
Side wall vortices can be eliminated by fillets sloped 45-deg if sufficiently high. The ANSI/HI 9.8 recommendations for upstream suction bells are D/2 for floor clearance and 3/8 D for fillet height, thereby placing the top of the fillet D/8 below the bell rim-a safety factor of about 2.
Floor vortices can be virtually eliminated by a flow splitter with 45-deg sides and also 3/8 D high. Flow splitters with base width equal to height (side slopes of 63.4--deg) are the steepest that can keep floor vortices under reasonable control. A slope of 45-deg is preferable if it leaves room for workers' feet during installation.
In clear water applications, cones under suction bells are also effective at eliminating floor vortices. The diameter of the cone must be twice the floor clearance and the apex must be in the plane of the bell rim. Four, or preferably six, vanes can reduce swirling to much less than the maximum allowed in ANSI/HI 9.8. Some hydraulic model testing experts greatly prefer flow splitters instead of cones.
Trenches narrower than 38-in are physically too confining for workers. If there are two duty pumps in a trench, that difficulty essentially precludes the use of fillets and flow splitters for capacities much less than about 10-Mg/d. Just omit flow splitters and fillets for smaller pumping stations and use materials more resistant to cavitation than gray cast iron. Many trench-type stations that have no fillets or flow splitters but do have nickel in the iron have operated very satisfactorily for many years.
Uneven Distribution of Throat Velocities
ANSI/HI 9.8 limits the variation in throat velocities to 10 percent. Uneven and fluctuating throat velocities in the suction bell have not been a problem in trench-type wet wells with column, wet pit submersible, horizontal dry pit or vertical dry pit pumps when the vertical dry pit pump is preceded by a long-radius reducing elbow wherein the exit velocity is at least twice the inlet velocity.
Self-Cleaning
The wet well is cleaned by dewatering it rapidly (pump-down) with the last pump. Choose a time when the inflow is about half the capacity of the last pump. As the water level falls below the top of the ramp, a hydraulic jump is formed. As the water level continues to fall and the hydraulic jump approaches the foot of the ramp, the currents wash floating material to the last pump where it is entrained in the fluid and pumped out. As the jump progresses along the floor, it suspends all remaining debris and the currents wash the debris into the pump.
Consider, for example, a wet well featuring three equal variable-speed pumps (two duty pumps) with 25-in suction bells having an entrance velocity of 4-ft/s-an 18-Mgal/d facility. A single duty pump would have a capacity of about 10-Mgal/d (15.5-ft3/s). Assume cleaning occurs when the inflow is 7.8-ft3/s. At the bottom of the ramp, the velocity is about 17-ft/s (from Figure 5), and the depth of flow is only 0.3-ft. The flow splitter ends at Node 15 and the average water depth drops accordingly. The Froude number never falls much below 6 and the sequent depth (height of jump) remains above 1.3-ft. As the last bell should be no higher than D/2 below the sequent depth to prevent loss of prime, the bell should be at an elevation no higher than 1.3 - 25/ (2x12) = 0.26-ft above the upstream floor. It should also be D/4 or 0.52-ft above the floor below, so the floor must be lowered by 0.52 - 0.26 = 0.26-ft.
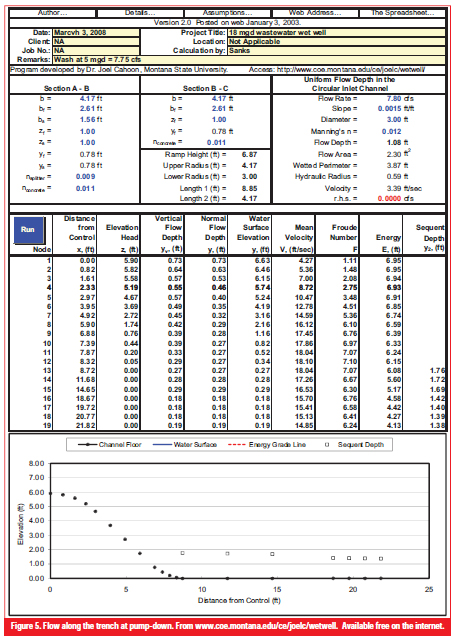
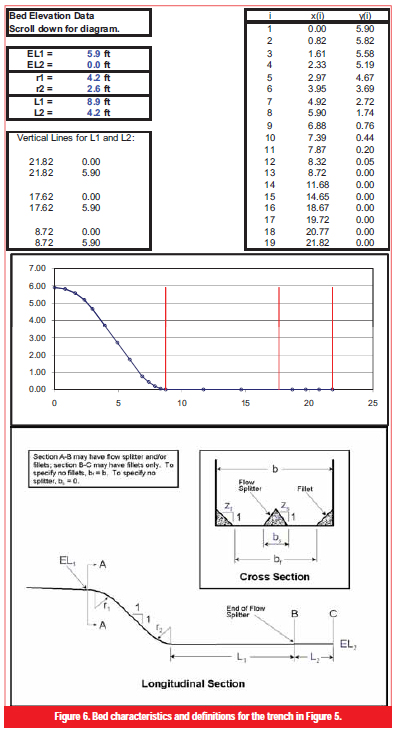
Cleaning would be adequate if, at the foot of the ramp, the depth of water were 0.1-ft or more with a velocity of 12-ft/s or more and if the Froude number at the end of the wet well were at least 3. The cleaning performance indicated by Figure 5 (depth 0.27-ft, velocity 18-ft/s at foot of ramp and Froude number 6.2 at end of trench) is superb.
Cleaning Time
The time can be calculated by estimating the volume to be discharged and the net flow rate into and out of the basin. The volume in the sewer pipe is that between the draw-down curve and the original depth. If 18-Mgal/d (27.9-ft3/s) fills a 3.0-ft pipe, 7.8-ft3/s fills it to a depth of 1.25-ft. (See Figure B-5 in Pumping Station Design [3].) Critical depth is 0.88-ft from UnifCrit2.2 [5], so draw-down at the end of the pipe is 1.25 - 0.88 = 0.37-ft. If the draw-down curve is roughly 600-ft long at the end of pump-down, the volume, V1, in a parabolic wedge is
V1 , Approximate volume of draw-down......... 600 x 3 x 0.37 x (1/3) ≈ 220-ft3
V2, Volume above trench = 1.85(4.17+8.0)(1/2)21.04.......................240
V3, Top of trench to 0.3-ft above floor = 4.97 x 4.17 x 17..................350
V4, Empty two column pumps = (18/12)2 π/4 x 2 x 30......................110
Pumping at 15.5-ft3/s with an inflow of 7.8-ft3/s gives a net discharge pumping rate of 7.7-ft3/s. The volume in the wet well is 220 + 240 + about half of 350 = 635-ft3. The time required to pump this amount is 635/7.7 = 82 s. The pump probably loses about 15 percent of its capacity at low submergences, so the rest of the water (110 + 350/2 = 285-ft3) is discharged at a net flow rate of 15.5 x 0.85 - 7.8 = 5.4-ft3/s. This part takes about 53 s. The total time is about 2.3 minutes.
If two pumps are used to discharge the 635-ft3, the net pumping rate is 27.9 - 7.8 = 27.1-ft3/s, and the 82 s shrinks to 23 s for a net cleanout time of about 1.3 minutes.
Grease
Grease accumulates on walls between high and low water levels and must be occasionally removed. It clings tightly to concrete and may have to be scraped off. It can be more readily washed off walls coated or lined with plastic with a water jet of about 25- to 30-gal/min at a nozzle Pitot pressure of about 90-lb/in.2. Although expensive, coating is well worth the cost.
Easy access to all wall areas with the water jet helps facilitate removing grease. The jet must be close to the wall to be effective, so attach a nozzle to the end of a long tube to make a water "lance" that can reach to within a yard or so of the surface to be washed. Access hatches make washing possible, but they are a nuisance. A better solution is an inside walkway the full length of the wet well (as shown in Figure 4), but the entire space must then be well-ventilated and the vented air treated-all of which results in additional cost. However, ventilation and treatment protects concrete from corrosion and does allow easy access (not readily achieved otherwise) to the suction bells for clearing out trash or for other needs, so the walkway can be justified in many pumping stations.
Caveats
There are some caveats that must be heeded for a trench-type wet well to be completely successful.
Caveat 1. Flow Splitter on Ramp
To retain the energy developed by the ramp and to obtain a swift flow of water along the floor during cleaning (as in Figure 5), the flow splitter must begin at the top of the ramp and continue without interruption to some point between the last two pumps. (See the "Model" section for an extensive discussion of flow splitters.) At super-critical velocities, any type of obstruction saps energy, may send a jet of water flying and certainly reduces cleaning capability. If the flow splitter begins at the base of the ramp, the water-now at very high velocity-strikes this obstruction, jumps off the floor, probably impacts the first pump bell, loses nearly all of its energy and never regains it. Quick cleaning is prevented. The trench can still be cleaned, but now it is by turbulence and attrition only. That process is slow, and the pump must run for many minutes under severe conditions.
As with flow splitters, the fillets also must begin at the top of the ramp. They should extend to the back wall to prevent the formation of side wall vortices at the last pump.
Caveat 2. Water Guide
If the water from the inlet pipe is allowed to spread wider than the trench itself, some of it runs up on the sloping wall above the trench, where it slows and then falls back into the main stream at low velocity and disrupts the main flow. To prevent this occurrence, raise the sides of the trench near the top of the ramp to form a "water guide" that keeps all the water confined to the width of the trench. Water may run up on the fillets, but they are small, and the deleterious effect is not pronounced.
Caveat 3. Elevation of last pump intake
Pumps in confined trenches often lose prime when the suction bell submergence is less than D/2. So place the bell rim at least D/2 below the sequent depth (given in Figure 5), and drop the floor under it to give a floor clearance of D/4. At greater floor clearances, larger grit and small stones may not be picked up by inlet velocities around 4-ft/s.
ANSI/I 9.8 allow inlet velocities between 3- and 8-ft/s with a recommendation of 5.5-ft/s for medium-size pumping stations. One manufacturer designs solids handling column pumps for 3.5- to about 5-ft/s, and the authors recommend these lower velocities to prevent large, heavy trash such as parts of bricks or concrete blocks from being sucked into the pump and damaging it. (Include a rock trap upstream or just remove large, heavy trash manually from the trench as necessary.) Submersible pumps are designed for very high inlet velocities, so if the last pump is a submersible, add a suction nozzle with a flare to reduce the inlet velocity to 5-ft/s or less.
Caveat 4. Cone Under Last Pump
Because the last pump has a floor clearance of only D/4 (so as to scour grit effectively) and any flow splitter must clear the rim by 3-in to pass solids, there is not enough room for an effective flow splitter in moderate-size pumping stations. Consequently, a cone under the last suction bell is a logical substitute for the flow splitter (see Figure 7).
During pump-down for cleaning, water has a strong tendency to circulate between the last pump and the end wall. That circulation results in an upstream current on one side of the trench that keeps the hydraulic jump far upstream. The circulation can be so strong that it can go under the suction bell (even though the pump is running) and travel upstream. To prevent this occurrence, a fore-and-aft vane on the cone is needed (as shown in the figure below).
Caveat 5. Anti-Rotation Baffle
The tendency of water to circulate behind the last pump was described in Caveat 4. To complete the suppression of flow between pump and end wall, an anti-rotation baffle (or barrier) is also required. Allow a minimum of construction clearance between the pump column and the baffle, but note that column pumps move slightly when pumping. Consult the manufacturer for details on how much to allow for that movement.
Caveat 6. End Wall
During normal pumping, the stagnant water behind the last pump tends to form a surface vortex. Such vortices take the form of the letter "J". If the wall is moved close to the pump (ANSI/HI 9.8 recommends 0.75 D from the pump centerline), it intersects the "J" and the vortex does not organize. Sloping back walls outward allows the creation of a vortex.
Forming Flow Splitters and Fillets
In the early stages of development, designing a flow splitter or fillets on a curving ramp was not an easy task with either models or prototypes.
Models
After a model test in a commercial laboratory showed that a flow splitter merging into the bottom of a ramp largely destroyed the energy of the flowing water and caused downstream flow to become subcritical, a machinist at Montana State University suggested making the curved portions of flow splitters and fillets of a two-component casting compound [6]. The one chosen is very strong but flexible.
Pour a slight excess into a wooden mold coated with floor wax. If the nose is gently tapered, one end of the mold can be suitably tapered to form a continuous nose. As soon as the compound cures enough to allow it, trim off the excess with a sharp knife. After final cure, warm the flow splitter with a bathroom heater and bend it over curves cut into wood with a band saw. The compound takes a permanent set upon cooling, but it does relax a little, so make the curves a little (say, 10 percent) sharper than the ramp curves. Fasten the pieces to the ramp with rubber cement, screws or both. Straight sections of fillets and flow splitters can be more easily made of wood well painted to resist moisture change and warping.
With model flow splitter and fillets installed all the way up the ramp, the improvement in cleaning was dramatic. Velocities were very high at the foot of the ramp and remained high to the end of the trench. But when the flow splitter was changed to end at the toe of the ramp, the energy and high velocity were destroyed. The downstream flow was turbulent but of subcritical velocity that would not scour quickly. There is no comparison between the performances of the two designs. Therefore, both flow splitter and fillets must extend to the top of the ramp for adequate cleaning potential.
Other Means of Fabricating Model Flow Splitters and Fillets
Although casting compound is by far the most satisfactory material when installed, its use is involved and time-consuming. One way is to make the flow splitter and fillets entirely of wood. Cut it into thin cross-sections over curves, and set the sections in bathtub caulking compound such as Dap. After the Dap cures, coat the entire unit with Dap to waterproof it and fill the cracks. The result is ugly and rough but reasonably quick and easy.
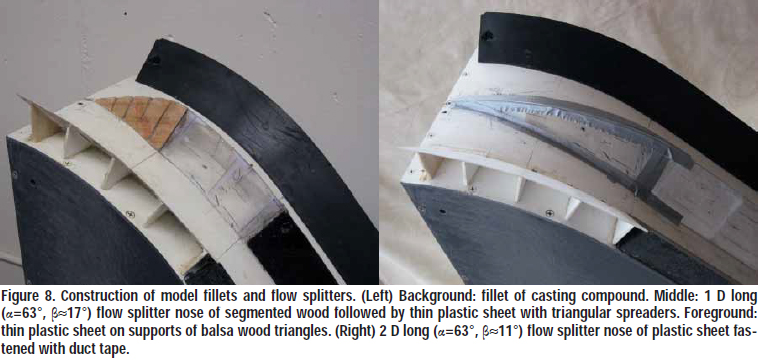
Another quick, easy method is to make flow splitter and fillets of thin (40-mil) plastic. It can be cut with tin snips and has about the right amount of stiffness. The strips for a flow splitter can be joined at the apex and to the floor with either Dap or long, narrow strips of duct tape pressed down firmly. Supports for fillets can be triangular pieces of plastic or thin (1/8-in) balsa wood, which can also be cut with tin snips. These are glued to the plastic strip with Dap or super glue at intervals of 3 to 6-in as appropriate. These methods are illustrated in Figure 8.
Plastic sheets (for models and steel plates for prototypes) over ramp curves must be cut to the proper curvature. If the ramp curve has a radius of r, the formula for the radius, R, of a flat sheet to fit it is
where is the angle between ramp and sheet.

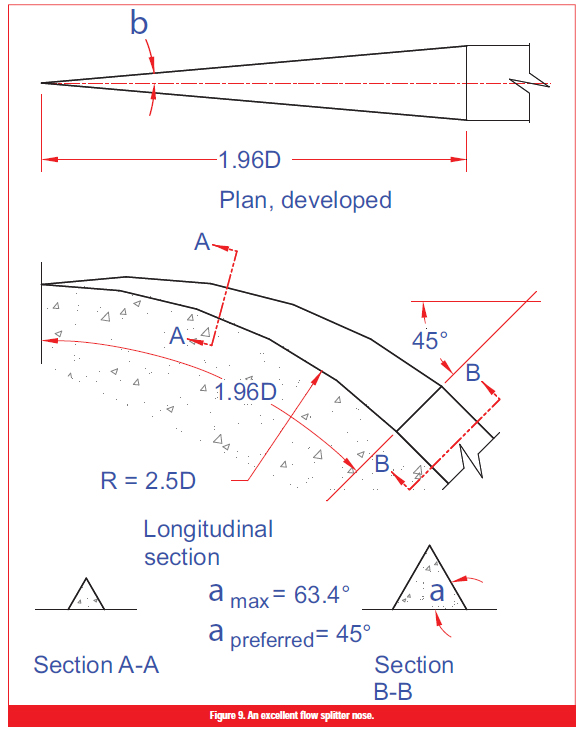
Flow Splitter Noses. A flow splitter must have some kind of nose. One of the easiest to make and best in performance tapers linearly from full size where it joins the prismatic flow splitter to zero at the top of the ramp. If ß is the angle between the centerline of the ramp and the contact between nose and ramp (see Plan in Figure 9), the formula for the radius of curvature becomes
![]()
The nose of a flow splitter separates the incoming flow into two streams that must have enough depth and velocity everywhere to wash debris off the ramp. Tests of inflow from horizontal pipe (low fluid velocity) and from approach pipe (high fluid velocity) were made at flow rates of 50 and 75 percent of the last pump's capacity. The best of several noses tried is shown in Figures 8b and 9. The apex angle (2 ) is constant and the nose height tapers linearly over a length of approximately 2D from the bottom of the upper ramp curve to the top of the ramp. A very long (4.3 D) nose was very good, and a very short (D long) one was adequate.
 Other Model Materials. Still another method is to cut fillets and flow splitters from plastic foam with a knife, table saw or band saw, bend them to follow the contour of the ramp and fasten them with rubber cement or even duct tape. One suitable material is Ethafoam [7], a polystyrene closed-cell, relatively rigid, strong foam. It holds a curvature if warmed and bent while cooling.
Choice. If the model floor can be removed for convenience in constructing fillets and flow splitters, the use of thin plastic sheet material is as easy and quick as any method. If not, the use of foam on ramp curves and either foam or wood for straight sections is easier. Either kind of flow splitters and fillets is easy to remove and replace--an advantage for demonstrating their value.
Prototype Fillets and Flow splitters
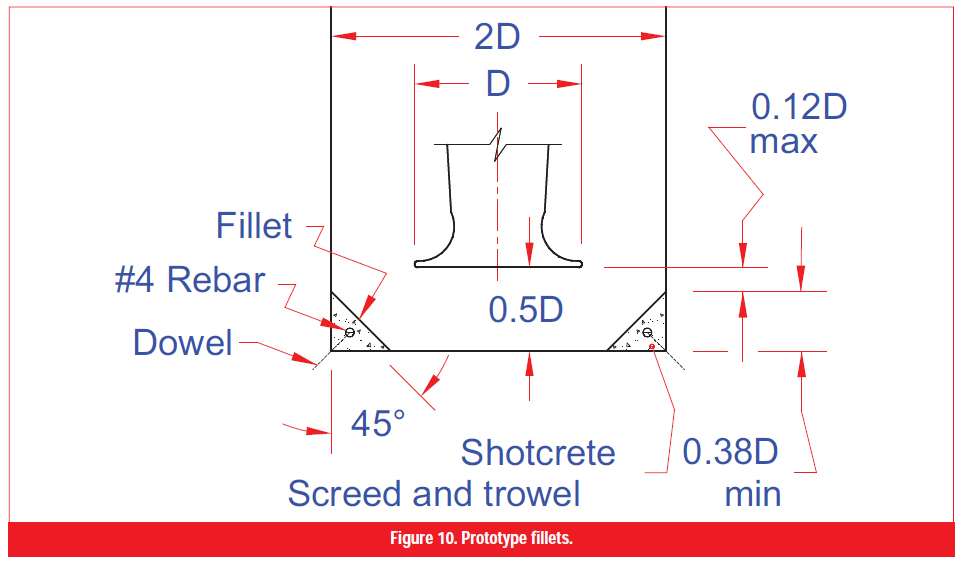
Prototype fillets are easily made with shotcrete anchored into the corners with dowels (and with a rebar or two running the full length), screeded and troweled smooth. If greater smoothness is needed as in long wet wells, coat the concrete with epoxy or line it with PVC. See Figure 10.
Practically the only load on flow splitters is during construction when the pumpcrete can exert a pressure of 1- or 2-lb/in.2, so fastenings are needed primarily to hold the shape. Flow splitters can be made of 1/4-in or even (for very large ones) of 3/8-in stainless steel (ss) plate Type 304L, 316L, or 347. Straight sections can be bent as shown in Figure 11a and held by 5/8-in anchors either cast in the concrete or set in two-component adhesive in drilled holes. Alternatively, the construction shown in Figure 11b can be used.
Along ramp curves, the plates must be cut to the radii given in Equation 1 (or 2 for noses), and then they must be flexed and stitch-welded at the apex. The type of construction in Figure 11b can be used, or the detail in Figure 11a can be followed if the plates are cut off a little below the floor and tabs are fastened to them for the bolts.
The optimum slope for the sides of flow splitters is 45-deg, but if the trench is narrow and the width of the floor too confining, steeper slopes (up to 2:1 = 63.4-deg) are acceptable. In the 18-Mgal/d pumping station example, a flow splitter with sides sloping 45-deg leaves floors only 6-in wide, whereas a 2:1 slope provides floors 11-in wide. It is designer's choice.

For the detail in Figure 11b, specify that on ramp curves the contractor shall (before cutting expensive stainless steel) make wood patterns of the flow splitter (and its nose) of thin (1/8- to 1/4-in) plywood, transport them to the field and scribe accurate offset lines on them so that the steel sheets follow all the imperfections of the concrete surface.
The cost of flow splitters varies greatly with contractor and circumstance, but a budget figure today is about $550/linear ft for the flow splitter in Figure 11b-mostly for labor. It may cost more on the ramp. The flow splitter in Figure 11a is probably less expensive.
Conclusion
A trench-type wet well built to the recommendations of the American National Standard for Pump Intake Design [1] augmented by the advice herein is a superb performer and needs no improvement. However, model study is required if a pump exceeds a capacity of 40,000-gal/min, if the station capacity exceeds 100,000-gal/min, if pump operation and reliability is exceedingly critical, if approach flow is non-uniform or asymmetric or if the geometry of Figure 1 is altered.
Acknowledgements
This paper was sent to all commercial laboratories that test hydraulic models of pumping station wet wells. The correspondents were Thomas Demlow of Northwest Hydraulic Consultants, Inc., Andrew E. Johansson of Alden Research Laboratory, Richard E. Long of ENSR, and Tatsuaki Nakato, recently retired from the University of Iowa. There were suggestions for additions and word changes but no disagreements. Other reviewers were Garr M. Jones and Lawrence Oeth of Brown and Caldwell, Arnold Sdano of Fairbanks Morse Pump Corp., Sateesh Nabar of Nabor Stanley Brown, Inc., Sarwan Wason and Mike Zappone of Carollo Engineers, Constantino M. Senon of MWH Americas, Inc., and William Wheeler of Wheeler Designs. Arnold Sdano converted the penciled figures into electronic form. The authors express their gratitude to all those who contributed.
List of References
1. ANSI/HI 9.8-2008. American National Standard for Pump Intake Design, Hydraulic Institute, Parsippany, NJ (scheduled for publication in 2008).
2. Sanks, R.L., G. Tchobanoglous, B.E. Bosserman, and G.M. Jones. Pumping Station Design, 2cd Ed., Butterworth-Heineman, Boston (1998).
3. Jones, G.M., R.L. Sanks, G. Tchobanoglous, and B.E. Bosserman. Pumping Station Design, 3rd Ed., Elsevier, Boston (2006).
4. Trench2.0. A user-friendly computer program developed by Prof. Joel Cahoon, to calculate water depths, velocity, Froude numbers and sequent depths along the trench in trench-type wet wells. Available free at www.coe.montana.edu/ce/joelc/wetwell.
5. UnifCrit2.2. A user-friendly computer program developed by Prof. Joel Cahoon to calculate flow rate, velocities, water depths and critical water depth in circular and trapezoidal open conduits. Available free at www.coe.montana.edu/ce/joelc/wetwell.
6. Obtainable from McMaster-Carr Supply Co., Santa Fe Springs, CA. (www.mcmaster.com) as two-part casting compound No. 8644K11 for 1-lb (25-in3) or as No 8644K12 for 10-lb (250-in3).
7. Obtainable from many sources including McMaster-Carr Supply Co. as Item No. 86155K33.

