Aligning an electric motor coupled to a large air blower required multiple measurements.
Around 18 years ago, a client needed assistance aligning an electric motor (more than 1,000 horsepower) coupled to a large air blower. This was a critical piece of equipment that was routinely shut down for preventive maintenance at regular intervals to ensure trouble free operation. The mechanical contractor used for this alignment was reputable, and the customer had used him several times in the past for this task with satisfactory results.
Vibration Problems
Upon start up, vibration levels were so high that the package tripped and shut down before reaching full rpm, preventing any meaningful collection of vibration data to help identify the problem. This continued for two days. Convinced that the problem was alignment related, the contractor made multiple corrections with the same results. Every time the package was started, vibration levels were high, and the package shut down before reaching full rpm.
Laser Shaft Alignment Assessment
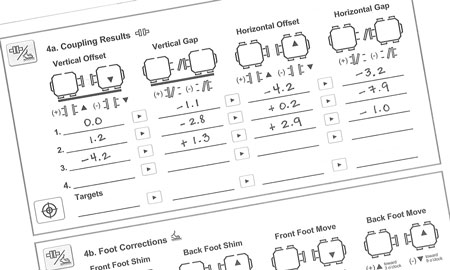
The client requested that a shaft laser alignment system be used to ensure correct alignment. The motor and the blower were uncoupled, and all the hold down bolts were at spec. Initial readings were taken. Remember, this was more than 18 years ago, so the alignment system was a much less sophisticated system than those available today. The laser was supplied with an alignment recording form that was filled in by hand (See Figure 1).
The dimensions, coupling results and foot corrections were recorded. The form also served as the final alignment report. All the necessary information and the first set of alignment readings were recorded. A second set of readings were also taken and recorded for comparison.
 |
Figure 1. Sample alignment recording form
Upon review, the results of the first set of data and the results of the second set were significantly different. A third set of alignment readings was taken and compared to the previous two, and again, a different set of values was obtained. Three sets of readings had been taken, all with the same amount of rotation and direction, and none of the results repeated. Something was wrong.
The Value of Multiple Measurements
Many modern laser shaft alignment systems are advertised as user-friendly and guide the end user through the alignment process. They are programmed in such a way that they encourage taking only one set of measurements and immediately make corrections. After the corrections are made, they indicate that no other measurements are necessary. This is dangerous and misleading.
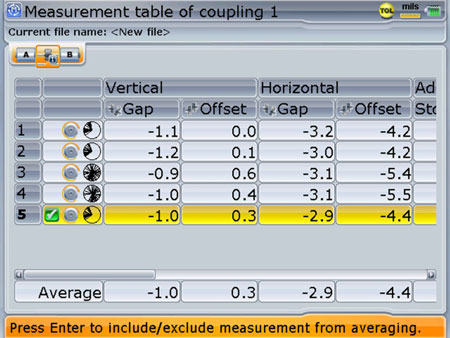
A wise man once said “measure twice, cut once.” These are words to live by when shaft alignment is an issue. Some of the laser systems available have a feature called the measurement table that automatically records consecutive measurements and allows the end user to view the results and verify their repeatability. If the measurements don't repeat, the corrections won't repeat either.
If the machine being aligned has any of the following issues, the measurements will not repeat:
• A bad bearing, which will not hold the shaft in place during measurements
• A bad base that is no longer rigid
• Ambient vibration
The ability to repeat measurement results ensures the accuracy of any corrections made to the alignment. The opposite is also true and will result in multiple, unnecessary corrections.
Because of the lack of repeatability, the equipment could not be aligned. Time and money would be wasted continuing to attempt alignment. The problem was likely mechanical on the motor side. This was confirmed with a lift check of the shaft. The equipment would not align until the mechanical problems were resolved
Two weeks later, the client asked for the alignment of the same motor and blower. The motor had been serviced, and the bearings and the shaft had been replaced. This time, the measurements repeated, and the alignment was completed in less than an hour. The machine was returned to service without further issues.
Conclusion
The moral of the story is “measure twice, cut once.” Repeatability, or the lack of it, should scream volumes to the end user. Putting an expensive alignment system on a piece of equipment that is mechanically compromised does not automatically make that machine alignable, and problems may go undetected with only a single set of measurements.
An alignment system with a measurement table feature is essential to quickly and easily check for repeatability (See Figure 2). When it comes to alignment, never make corrections based on only one set of readings, and never make corrections unless the readings repeat.

Figure 2. Sample alignment measurement table
The only exception to this rule occurs if a high-end laser shaft alignment system capable of displaying the standard deviation value (SD) of the readings is used. The SD provides instant determination of the readings' reliability. It is a highly accurate measure of quality, and a low SD means time is not wasted repeating readings and comparing them in a table.

