This article will discuss steel tolerances and seal tolerances as they relate to elastomeric seals used on rotating equipment. The part of a shaft where a seal will be used should be dimensionally correct for the seal to function effectively. There are several standards that may be used, depending on where the seal is manufactured. Some of these standards include the Rubber Manufacturers Association (RMA), the German standard (DIN), the International Standards Organization (ISO) and the British Standard (BS). Since many of the seals sold in the United States are produced in Asia, this will focus on the RMA standards (U.S. and India) and the ISO standards (China and Taiwan), although German seals produced to inch dimensions also use the RMA standards.
First published in 1987, ISO 9001 helps organizations demonstrate the ability to consistently provide products and services that meet end user and regulatory requirements. Indian factories utilize the ISO tolerances. RMA standards are used in the U.S., as well as in China and Taiwan unless otherwise specified.
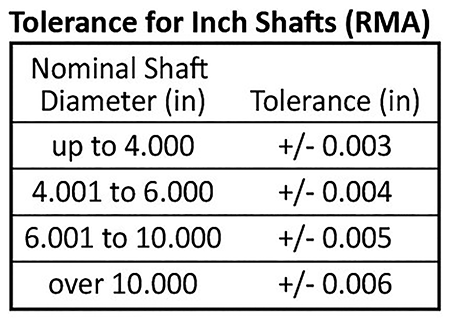
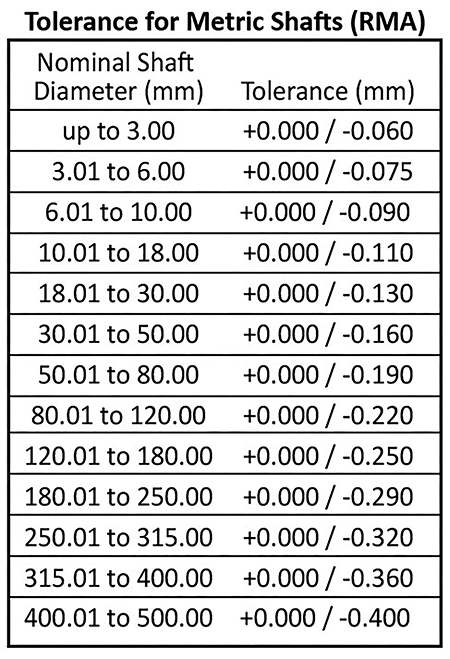
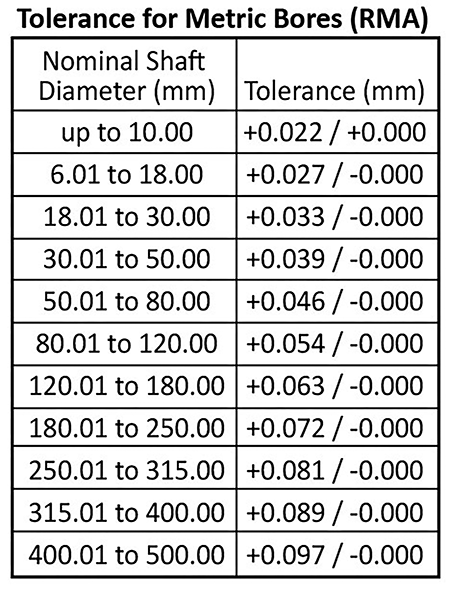
In the seal industry, the dimensions that are used when describing a seal are the steel dimensions, i.e., the shaft, bore and width/groove dimensions. It is important these dimensions are used rather than the actual seal dimensions. Using the steel dimensions, the manufacturer will ensure the seal is produced with a seal inside diameter (ID) that is smaller than the shaft diameter to ensure there is interference between the shaft and the seal to prevent leakage. The seal outside diameter (OD) will also be slightly larger to ensure there is a press fit interference when installing the seal in the bore. For the steel dimensional tolerances, this article will only discuss the shaft and bore. The RMA specifications for shaft diameter (steel) tolerances are as follows:
The finish of the shaft surface in the area where the lip contacts the shaft is critical to the proper functioning of the seal. The shaft must be rough enough to allow the seal lip to bed into the shaft during the initial use. The shaft will eventually become smooth, and the seal wear track will become rough. If the shaft surface is too smooth, this bedding-in process will not occur. If the shaft surface is too rough, excessive seal lip wear will occur. Early leakage will result in both cases.
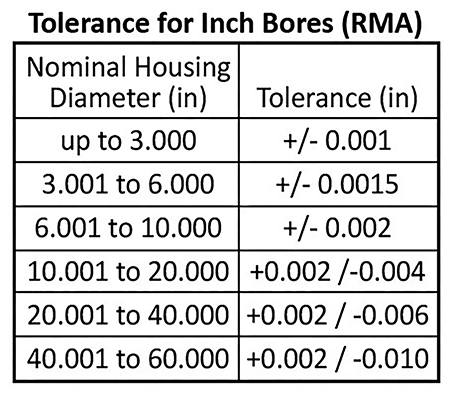
For the bore diameter, the RMA has provided the following tolerances:
Once the shaft and bore steel dimensions have been verified and provided to the seal manufacturer or distributor and the design (profile) of the seal has been selected along with the seal material, then sampling should occur for new applications. As with the steel dimensional tolerances listed previously, there are also seal dimensional tolerances that must be considered.
Although RMA and ISO provide tolerances for seal ID, OD and width, the seal manufacturers work within a range of dimensions, based on their manufacturing experience and other considerations to determine the actual ID, OD and width of the seals that they produce. These other considerations include:
Press-fit tolerance:
The actual OD of the seal is produced slightly larger than the bore size to create the interference needed so the seal will not slide out of the housing during operation.
Seal ID:
The seal ID will be smaller than the shaft (steel) ID so there is sufficient interference of the lip material on the shaft.
Spring:
The size of the spring that sits in the spring groove provides consistent and even pressure around the lip.
Shrinkage:
Manufacturers also must consider shrinkage depending on the type of rubber material, particularly its durometer (hardness), when producing elastomeric seals.
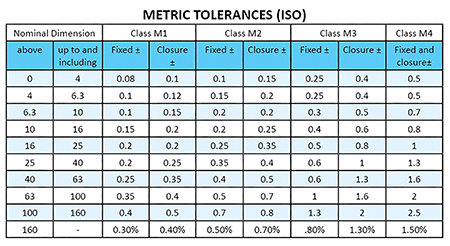
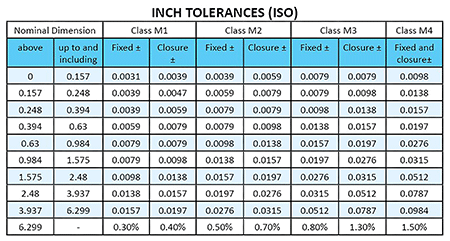
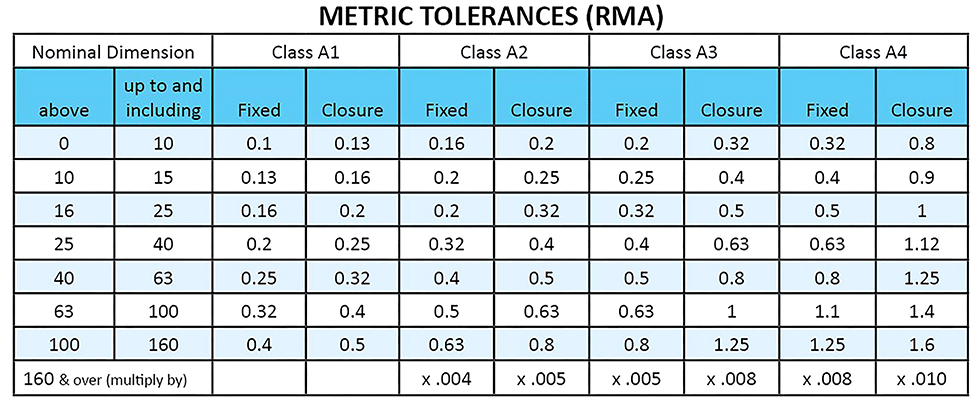
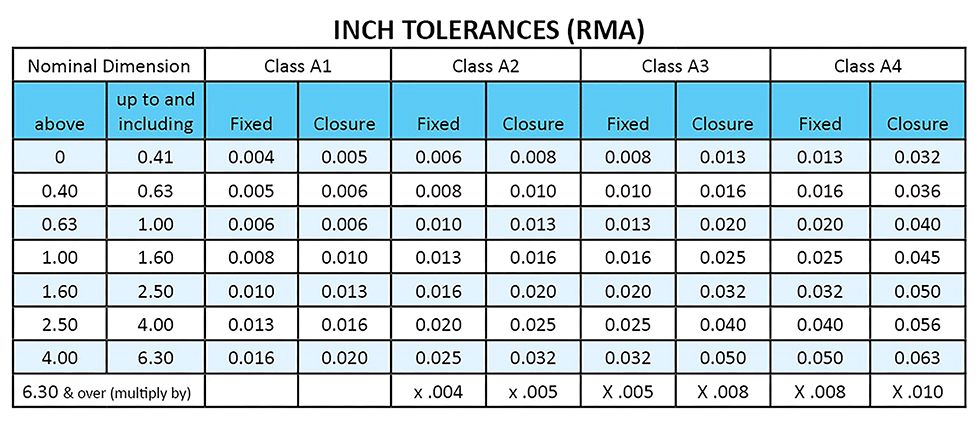
ISO 3302-1:2014 specifies classes of dimensional tolerances and their values for molded, extruded and calendared solid rubber products. The relevant test methods necessary for the establishment of compliance with ISO 3302-1:2014 are also specified. The tolerances are primarily intended for use with vulcanized rubber but can also be suitable for products made of thermoplastic rubbers. Elastomeric seals use the M1 Closed standard, unless otherwise specified by the end user. RMA is typically the standard used in commercially engineered rubber components. Standard seals use the A2 Precision Standard. There are four classes of RMA standard:
A1 high precision
This is the tightest tolerance classification and indicates a high precision rubber product. Such moldings require precision molds, fewer cavities per mold, close mix controls, etc., which results in high cost. Optical comparators or other measuring devices may be required to minimize distortion of the rubber part by the measuring instrument. This part requires expensive control and inspection procedures.
A2 precision
These moldings involve much of the close controls required for the A1 class. Molds must be precision machined and kept in good repair. While measurement methods may be simpler than the above class, careful inspection will usually be required.
A3 commercial
This class indicates a general grade or commercial product. This is the most commonly used class.
A4 noncritical
Molds by this class apply to products where control is noncritical and secondary to cost.
For example, a seal meeting RMA standard with a rubber covered OD such as an “AS” profile (all rubber covered with primary sealing lip and a dust lip) designed to fit a 2.500 inch bore will have a seal OD of 2.508 inches with tolerances measuring between 2.500 inches to 2.5011 inches. This same seal in a “B” profile (single metal case, single lip with spring) will have a seal OD of 2.504 inches with tolerances between 2.502 inches to 2.506 inches.
This same seal using the ISO standard would result in a seal OD of 2.5057 inches.
As this article has demonstrated, there are slight differences between the ISO tolerances and the RMA tolerances, and it is important to understand the users’ expectations regarding tolerances. If any questions should arise, application designers should consult their seal supplier for seal design recommendations for their specific applications.
References
Horve, Les (1996). Shaft Seals for Dynamic Applications, 5.2.2, p. 145
Dichtomatik (2012). 2012 Oil Seal Catalog, p. 13, 15

