Calibration is an essential component of any manufacturing or industrial process. Without it, measurements have no real meaning, and consistency in product quality and process control, as well as efficiency, fall by the wayside.
But how does a facility establish calibration practices and benchmarks suited to their needs? What is needed to ensure that all systems operate in harmony across a facility or even a global operation?
First and foremost in any calibration process is traceability, closely followed by repeatability. In all instances, it is important to also consider that, while calibration happens in a tightly controlled laboratory environment, once a meter is put in the process there will be secondary effects that will further impact performance. The accuracy of the measurements while the meter is in service will depend on these effects and the meter type.
However, decent measurement starts with tightly controlled, traceable calibration practices and standards.
Traceability
Traceability is comprised of two essential components:
- An unbroken chain of measurement comparisons, each to a higher standard, that eventually link back to national or internationally maintained reference standards
- A documented uncertainty calculation that includes the accumulated uncertainties of all the previous measurement comparison links in the chain
Maintaining rigorous measurement traceability to internationally held standards ensures that a facility’s most important tools for flow process control (i.e., their flow meters) will meet local, state and federal regulations, as well as their own strict, internal quality standards. Taking mass flow as an example, traceability is the chain of measurement standards going all the way back to the International Mass Standard as determined previously by the International Bureau of Weights and Measures (BIPM), and more recently by the adoption of Planck’s constant.
The first reason traceability matters is that it documents the paths by which everything ties to a single central starting point. The second reason is that traceability will allow a facility to understand and
apply the appropriate level of uncertainty in their measurements.
Understanding uncertainty through the documentation of traceability is critical to finding the right balance between the cost of uncertainty and the benefits to product quality and process efficiency that would be gained by investing more resources and effort into achieving higher levels of uncertainty.
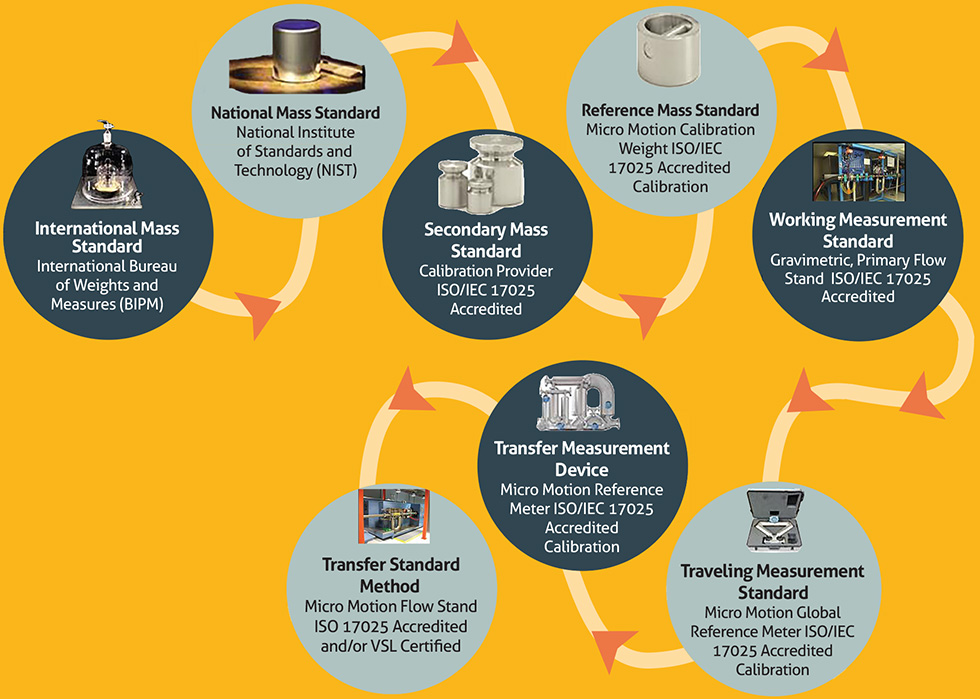 IMAGE 1: Example of a traceability chain (Images courtesy of Emerson)
An example of a chain of traceability is illustrated in Image 1. A valuable tool to help ensure traceability is accreditation. This is an example of accreditation to the International Organization for Standardization/International Electrotechnical Commission (ISO/IEC) 17025 standard “General Requirements for the Competence of Testing and Calibration Laboratories”—an officially authorized recognition of the traceability and uncertainty of a calibration link in the chain.
Several of the links in this example list ISO/IEC 17025 accreditation that helps to verify and streamline the documentation of the overall traceability chain for the final calibration step.
A New Mass Standard
Until recently, all international measurement standards were tied to universal constants that can be found in nature, except for the mass standard, which was still based on a kilogram of platinum-iridium alloy that had been housed since 1889 at the International Bureau of Weights and Measures in Sèvres, France.1 This artifact is known as the International Prototype Kilogram, or Big K, or Le Grand K. There are copies of this prototype in laboratories around the world forged from the same piece of metal, including in the United States at the National Institute of Standards and Technology (NIST) in Gaithersburg, Maryland.
At the General Conference on Weights and Measures in Versailles, France, in 2018, members voted to tie the definition of a kilogram to a universal constant in nature.1 The change went into effect on May 20, 2019. One of the main reasons was because the Big K has lost around 50 micrograms since it was created, while still being defined as exactly 1 kilogram. The international standard for the kilogram is now tied to the Planck constant, a fundamental concept in quantum mechanics that will not change.
When it comes to mass calibration of a flow meter, that change will have an impact on the reproducibility and intercomparison of results from around the world, just as the kilogram is now a certain, set and stable constant.
Calibration Procedures
Knowing the traceability of a calibration standard is important. However, how does the calibration procedure fit into the equation? The process of calibrating a meter requires a strictly controlled environment in which a device is put through a series of tests.
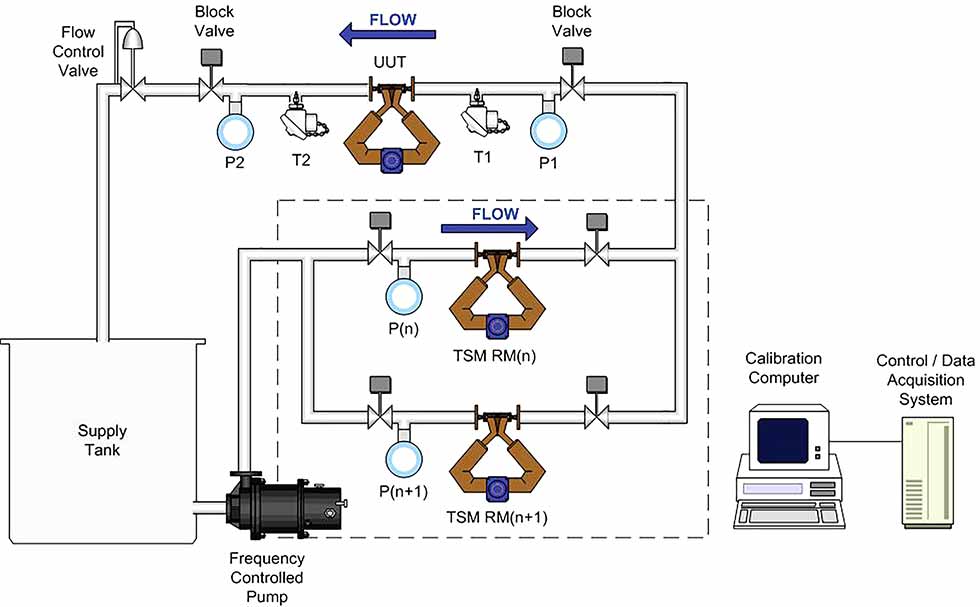 IMAGE 2: Dynamic start/finish (TSM) method. T = temperature transmitter and P = pressure transmitter
For example, there are different calibration procedures used when calibrating a Coriolis flow meter, such as dynamic start/finish with a transfer standard, and static start/finish with a weigh scale. Image 2 references a high-level overview of both the dynamic as well as the static start/finish methods of calibration. A third method, dynamic start/finish (DSF) with a diverter, can also be used for calibration with a Coriolis meter. However, this method is not discussed here because it is primarily used for other types of flow meters that do not handle flow rate transitions as well as Coriolis meters.
DSF or Transfer Standard Method
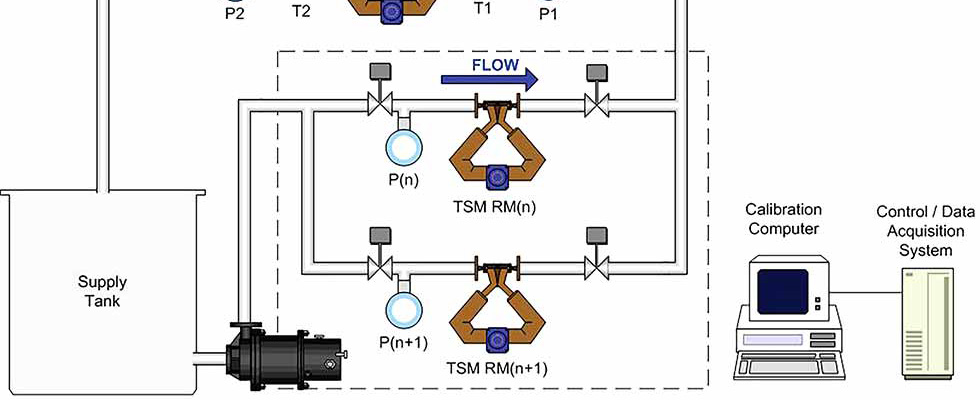
The transfer standard method (TSM) for calibration is a dynamic start/finish approach where the batch starts and ends at a steady flow. The calibration is performed in closed conduits and uses water as the test fluid. The water passes through the unit under test (UUT) and the reference meter (RM).
The RMs, two of them in this example, are also known as master meters and are known good meters initially calibrated on an ISO/IEC 17025 accredited primary gravimetric flow stand following the static start/finish method.
The TSM RM traceability is maintained annually using global reference meters for comparison testing. The mass total from the UUT is compared to the mass total from the RM by way of pulse counters, which are triggered on and off for both the UUT and the RM simultaneously. Fluid temperature and pressure are measured upstream and downstream of the UUT to ensure consistency and reproducibility of the process.
See Image 2 for a graphic representation of the TSM calibration process.
Static Start/Finish
Static start/finish is a gravimetric calibration method where the calibration batch begins and ends at a no-flow condition. The reference used in this method is a weigh scale that has been calibrated using traceable mass standards and the test fluid is water. The tank is first weighed to determine the tare weight of the water that is already in the tank. Then water is measured through the UUT and collected in the tank. The tank is weighed again and the final weight, minus the tare weight, is compared to the total mass measured by the UUT. When better uncertainty is necessary, the mass shown on the scale is corrected for the effect of buoyancy acting on the water in the tank and the effect on any immersed pipe.
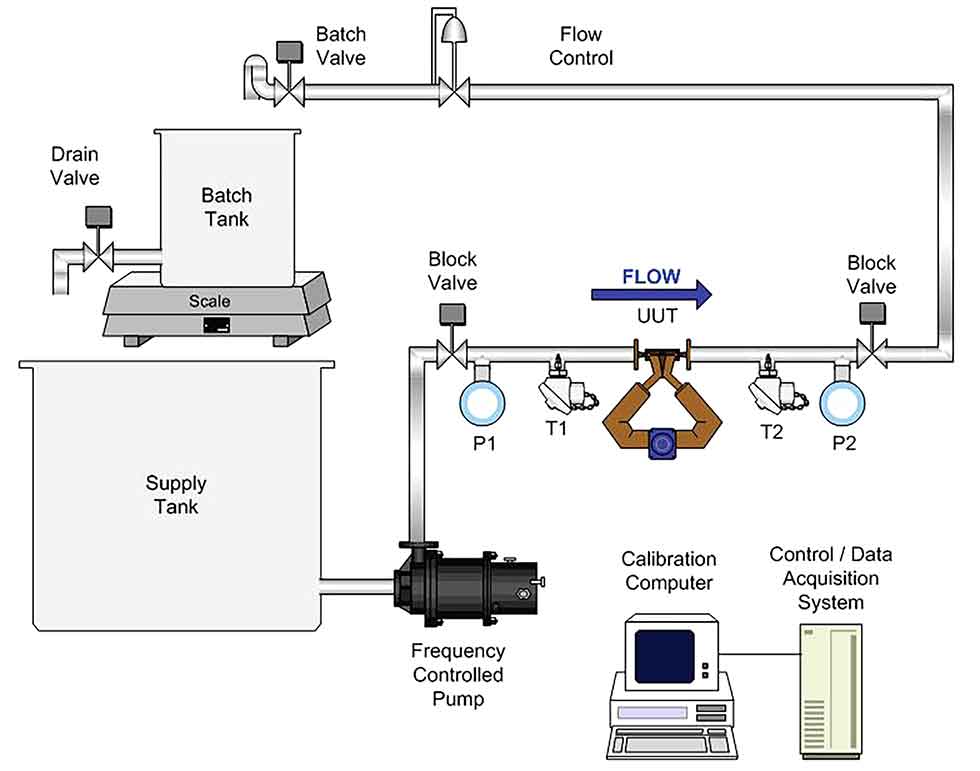 IMAGE 3: Static start/finish method. T = temperature transmitter and P = pressure transmitter
Fluid pressure and temperature are measured both upstream and downstream of the UUT. Ambient pressure, temperature and humidity are measured during each test. Image 3 illustrates how the static start/finish method works. However, it should be noted that this method is less efficient than the TSM method. So, it is only used to calibrate meters that have a purpose that justifies the tightest uncertainty possible over the less costly uncertainty of the TSM method.
Appropriate Uncertainty
When considering calibration methods and traceability standards, it is critical to understand the level and the cost of each incremental reduction to the uncertainty, and how tight of an uncertainty might be justified given the impact on the process that the meter will be used for. Uncertainty levels of the meter in service are determined first by the combined uncertainty of each of the traceability steps leading to the calibration of the meter, as illustrated earlier in this article. With each step further down the traceability chain, uncertainty increases in small increments—often negligible to the results of the process.
It is under controlled conditions that calibration and traceability happen; however, what happens after a calibrated meter leaves the laboratory? This is where secondary effects add more uncertainty to the performance of a meter in the process the meter is used for.
The combination of the calibration uncertainty and the effects of the process on the meter will determine the final uncertainty of the measurement, so it is important to understand the magnitude of the secondary effects of the process to call for the appropriate level of calibration uncertainty to ensure a quality product.
Knowing the susceptibility of a meter to process effects and the traceability and calibration uncertainty that is provided by the manufacturer will help choose which meter to select for the processes. The reproducibility of established calibration results will determine the interval needed between future calibration cycles and will help to ensure consistent product quality.
Understanding how a meter will perform in service will help in choosing the right meter. It will also help determine how much to spend on calibration so that the best possible measurement for the process, for the least amount of cost, with the least amount of effort, is achievable.
Confidence in the measurements is a key step on the path to true process quality control.
References
1. “The world just redefined the kilogram,” Vox.com, Brian Resnick, Nov. 16, 2018

